ShopDreamUp AI ArtDreamUp
Deviation Actions

Why care about SubD?:
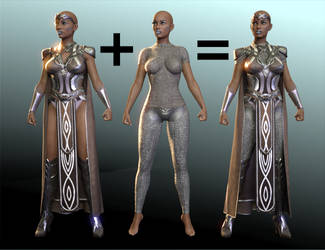
Lately I've been doing a lot of renders involving making tiny things giant, and sometimes that causes issues with the fact that they were made at low resolution for efficiency. They can come out looking very angular and jagged when sized up large. In that case, the best solution is to add levels of detail in DAZ Studio. Geometry will smooth right out, and your prop collection's usefulness and flexibility will greatly increase.
You can do this with literally anything, props, figures, clothing; and because it's just a single click, you don't have to have a content creator's level of involvement for it to be useful in your scenes.
What to do:
Select the item in the 3d Window.
Go to the Scene tab.
Click on the little button at the top right of that tab (or left, if you have it docked on the right of your screen).
Choose Edit--Geometry--Convert To SubD.
Now in the Parameters tab under General, you have a heading called "Mesh Resolution." By default it will be set to "high resolution" and subdivision level 1. You can drop the resolution to Base and 0 for exporting to make morphs (in fact, you must), or you can increase it to higher levels to give meshes a smoother and more sophisticated look.
The Subdivision Algorithm is also under this heading. By default it sets to Catmark. If you find this does odd things to your mesh, producing over-round corners or weird visual artifacts, click on this and choose "Catmull-Clark (Legacy)" from the dropdown.
That usually fixes it, in my experience. There will be a few items that just aren't suitable for use with SubD, but they are very few; almost anything can work with the Legacy algorithm in my experience, whether it was intended originally to work with SubD or not.
Today's handy tip for working in DS is brought to you by SickeYield Working On Too Much Stuff That is Under Non-Disclosure Agreement. (Wink)") There's just a lot going on that I can't really talk about right now.
There's just a lot going on that I can't really talk about right now.
Lately I've been doing a lot of renders involving making tiny things giant, and sometimes that causes issues with the fact that they were made at low resolution for efficiency. They can come out looking very angular and jagged when sized up large. In that case, the best solution is to add levels of detail in DAZ Studio. Geometry will smooth right out, and your prop collection's usefulness and flexibility will greatly increase.
You can do this with literally anything, props, figures, clothing; and because it's just a single click, you don't have to have a content creator's level of involvement for it to be useful in your scenes.
What to do:
Select the item in the 3d Window.
Go to the Scene tab.
Click on the little button at the top right of that tab (or left, if you have it docked on the right of your screen).
Choose Edit--Geometry--Convert To SubD.
Now in the Parameters tab under General, you have a heading called "Mesh Resolution." By default it will be set to "high resolution" and subdivision level 1. You can drop the resolution to Base and 0 for exporting to make morphs (in fact, you must), or you can increase it to higher levels to give meshes a smoother and more sophisticated look.
The Subdivision Algorithm is also under this heading. By default it sets to Catmark. If you find this does odd things to your mesh, producing over-round corners or weird visual artifacts, click on this and choose "Catmull-Clark (Legacy)" from the dropdown.
That usually fixes it, in my experience. There will be a few items that just aren't suitable for use with SubD, but they are very few; almost anything can work with the Legacy algorithm in my experience, whether it was intended originally to work with SubD or not.
Today's handy tip for working in DS is brought to you by SickeYield Working On Too Much Stuff That is Under Non-Disclosure Agreement.
Default VS. PBR Skin Shader: Alexandra 8 Tests
User @DigitalHallucination had some interesting comments and questions about shaders under the old Iray Surfaces tutorial from 2015. That led to some experimentation with shaders this morning, the results of which I will share now. Please, please feel free to comment and debate. I think this is an issue of interest to more or less all of us. I commented offhand that I didn't think the PBRSkin shader was an improvement, but that the maps in use were what made the difference, and DH disagreed with this and provided some comparison renders using Alexandra 8. They definitely looked definitive, so I decided to run my own tests. At first I tried it with base G8F, but that wasn't an apples to apples comparison because G8F originally uses the old glossiness method, so she's going to look worse compared to any shader that uses the new spec. So, like DH, I went to Alexandra. In this case I used the default lighting with the camera headlamp turned off, Subd1, Alexandra 8 at 100%, and the
Deviantart's Default AI Opt-In
EDIT: They put in a mass opt out! Thanks for letting me know when I missed the news, lovely watchers! I'm not thrilled about dA making AI opt-out and not opt-in, and putting it so you have to opt-out on each individual artwork. I have little to lose from this, because my product is 3D models and not the 2D promotional images, but it's especially predatory of people whose product and ouevre is 2D art. I don't know how many people are still here, but it's one more reason for people who draw and paint to delete their accounts.
Color Differences in DS 4.20.1.38
This was introduced by my notice by Snarl, and verified by my own render testing. I will show my results in the following discussion. There is a visible color difference in Iray render results in Daz Studio 4.20.1.38 vs. the pre-VDB, pre-ghost light fix 4.16.1.21 build I was able to test against. I rendered out to pngs and looked at both pngs on the same monitor to account for that type of differences. Here shown is G8F up close in default lighting on both builds. I checked all of the render settings to make sure they were the same, too, because if we could just change a render setting it would be an easy fix. This difference is relatively subtle. Let me show those separately so you can download them separately to compare. Here's 4.20: And here's 4.16: You might have to zoom in and set them overlapping so you see top part and top part or right and right, etc., but it's there. I don't know how or why this change has happened. Maybe it's because Daz decided the default was too
Babbling About Fluid Simulation
I have some feelings about sims right now. I have a lot of them, and I've just had caffeine. So I'm going to share them with you all. So, I recently submitted a water set for Daz Studio. Three times. You see, Daz3d didn't like either of my first two interpretations of the slosh pieces and pouring pieces that were simulated in Blender, so I ended up having to hand-sculpt parts of it and combine that with parts of the simmed pieces. The sloshes are entirely hand-sculpted from me staring at photo references, except for bits of the flying droplets I salvaged from the original simmed meshes. I wouldn't even have gotten that far if not for the very specific and detailed feedback they gave me, a privilege of working with the Review committee since 2011 and, I sincerely hope, demonstrating an eagerness to accept professional criticism when it gets me paid. I know for a fact that they have some artists where they just say an unvarnished yes or no because it's not worth getting yelled at
Featured in Groups

© 2014 - 2024 SickleYield
Comments13
Join the community to add your comment. Already a deviant? Log In
Tried it on some low poly guns. It didn't look good. I ended up with gaps! I will keep playing with it though. Thanks!