ShopDreamUp AI ArtDreamUp
Deviation Actions

This will not have a video. It is intended for advanced users of DAZ Studio. You need to know how to use your modeling software and how to rig a clothing item in DS before you even think about trying this.
I get asked about this occasionally, but usually I place it with reverse projection morphs in the category of "things that are too hard for the average user," so I just answer the question one on one. The purpose of this tutorial is to create a reference for future vendors, and to remind myself if I forget in future.
You can turn any item into a rigging template in DAZ Studio. You shouldn't, because a lot of items will work very poorly for that. Some things will also never produce good results with a template, because rigging them properly is based on doing an unusual procedure correctly (high-heeled shoes) or because their geometry is too complex for projection to be sufficient (things with detailed hanging sleeves, hoods, or other special surface features, or loincloths with a crotch section where precise rigging is needed in border areas).
Also remember that a template cannot convey joint-controlled morphs or rigidity maps, so you will still need to do those on any item you're rigging for commercial use. It's more of a shortcut to not have to keep manually adding the same bones to different items, which is why they're popular for AutoFit conversion.
With those important caveats, you create a template using these steps:
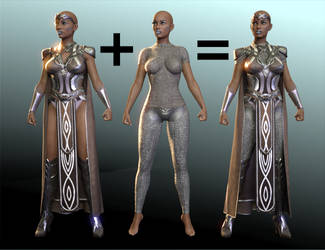
1. Create or load a rigged clothing item in DAZ Studio. It has to be in DS, and it has to be in TriAx or General Weight Mapping, not a .cr2. If creating a new one, its geometry from your modeling software should be simple, a single sheet of dense polygons. Remember, you're doing this for smooth transfer, not for looks. It can have custom bones, and mine always do; but it needs to be completely finalized, figure rigging memorized, etc., before you proceed to step 2. Make no mistake, this is the hard part; the rest is easy.
This item can have morphs that you want copied too, but they have to be simple enough to transfer well; "breast bridge fix" works, "skirt movement for an underlayer" does not (in fact, nothing involved with layered geometry works well with templates).
2. File--Save As--Scene Assets-- Figure/Prop Asset.
3. Choose a location for your .duf anywhere in the library. It won't matter because you're going to copy it to a new location. Give it the name you want to appear in the AutoFit and Transfer Utility, though, such as Short Dress 1 or Cape With Collar.
4. After you click Accept on that, a popup appears asking for the Vendor Name and Product Name. Choose the Product Name you want to use, but under Vendor Name put the full path to the template instead of your vendor name.
For Genesis 3 Female and a dress, a typical example is:
DAZ 3D/Genesis 3/Female/Tools/Projection Templates/Dresses
If it was Genesis 2 Male and pants it would be:
DAZ 3D/Genesis 2/Male/Tools/Projection Templates/Pants
Click Accept.
5. Copy the .duf you saved to the library (or cut it). You probably put it somewhere in People/Genesis or Genesis 2 or Genesis 3/Clothes.
In each DAZ figure's data files (which are always in data/DAZ 3D) there is a Tools/Projection templates and a Projection Templates folder. For this step, we want the one that is NOT under Tools. For Genesis 3 Female the path is:
data/DAZ 3D/Genesis 3/Female/Projection Templates
Here you will see Footwear.duf, Full-Body.duf, and the other default projection templates for the figure listed. If you see a lot of folders with those names instead, you are in the wrong place.
Paste your .duf from the library into this folder. If you wish, you may create a subfolder for your new category of templates; there are already folders called "Dresses" and "Hair." My own product for Genesis 3 Female adds one called "Cape."
Now if you load your figure (G1, G2, G3) from the library and load a clothing item from another generation, the AutoFit popup should show your new template in its list. Congratulations! You have created a new template for rigging in DAZ Studio!
I get asked about this occasionally, but usually I place it with reverse projection morphs in the category of "things that are too hard for the average user," so I just answer the question one on one. The purpose of this tutorial is to create a reference for future vendors, and to remind myself if I forget in future.
You can turn any item into a rigging template in DAZ Studio. You shouldn't, because a lot of items will work very poorly for that. Some things will also never produce good results with a template, because rigging them properly is based on doing an unusual procedure correctly (high-heeled shoes) or because their geometry is too complex for projection to be sufficient (things with detailed hanging sleeves, hoods, or other special surface features, or loincloths with a crotch section where precise rigging is needed in border areas).
Also remember that a template cannot convey joint-controlled morphs or rigidity maps, so you will still need to do those on any item you're rigging for commercial use. It's more of a shortcut to not have to keep manually adding the same bones to different items, which is why they're popular for AutoFit conversion.
With those important caveats, you create a template using these steps:
1. Create or load a rigged clothing item in DAZ Studio. It has to be in DS, and it has to be in TriAx or General Weight Mapping, not a .cr2. If creating a new one, its geometry from your modeling software should be simple, a single sheet of dense polygons. Remember, you're doing this for smooth transfer, not for looks. It can have custom bones, and mine always do; but it needs to be completely finalized, figure rigging memorized, etc., before you proceed to step 2. Make no mistake, this is the hard part; the rest is easy.
This item can have morphs that you want copied too, but they have to be simple enough to transfer well; "breast bridge fix" works, "skirt movement for an underlayer" does not (in fact, nothing involved with layered geometry works well with templates).
2. File--Save As--Scene Assets-- Figure/Prop Asset.
3. Choose a location for your .duf anywhere in the library. It won't matter because you're going to copy it to a new location. Give it the name you want to appear in the AutoFit and Transfer Utility, though, such as Short Dress 1 or Cape With Collar.
4. After you click Accept on that, a popup appears asking for the Vendor Name and Product Name. Choose the Product Name you want to use, but under Vendor Name put the full path to the template instead of your vendor name.
For Genesis 3 Female and a dress, a typical example is:
DAZ 3D/Genesis 3/Female/Tools/Projection Templates/Dresses
If it was Genesis 2 Male and pants it would be:
DAZ 3D/Genesis 2/Male/Tools/Projection Templates/Pants
Click Accept.
5. Copy the .duf you saved to the library (or cut it). You probably put it somewhere in People/Genesis or Genesis 2 or Genesis 3/Clothes.
In each DAZ figure's data files (which are always in data/DAZ 3D) there is a Tools/Projection templates and a Projection Templates folder. For this step, we want the one that is NOT under Tools. For Genesis 3 Female the path is:
data/DAZ 3D/Genesis 3/Female/Projection Templates
Here you will see Footwear.duf, Full-Body.duf, and the other default projection templates for the figure listed. If you see a lot of folders with those names instead, you are in the wrong place.
Paste your .duf from the library into this folder. If you wish, you may create a subfolder for your new category of templates; there are already folders called "Dresses" and "Hair." My own product for Genesis 3 Female adds one called "Cape."
Now if you load your figure (G1, G2, G3) from the library and load a clothing item from another generation, the AutoFit popup should show your new template in its list. Congratulations! You have created a new template for rigging in DAZ Studio!
Default VS. PBR Skin Shader: Alexandra 8 Tests
User @DigitalHallucination had some interesting comments and questions about shaders under the old Iray Surfaces tutorial from 2015. That led to some experimentation with shaders this morning, the results of which I will share now. Please, please feel free to comment and debate. I think this is an issue of interest to more or less all of us. I commented offhand that I didn't think the PBRSkin shader was an improvement, but that the maps in use were what made the difference, and DH disagreed with this and provided some comparison renders using Alexandra 8. They definitely looked definitive, so I decided to run my own tests. At first I tried it with base G8F, but that wasn't an apples to apples comparison because G8F originally uses the old glossiness method, so she's going to look worse compared to any shader that uses the new spec. So, like DH, I went to Alexandra. In this case I used the default lighting with the camera headlamp turned off, Subd1, Alexandra 8 at 100%, and the
Deviantart's Default AI Opt-In
EDIT: They put in a mass opt out! Thanks for letting me know when I missed the news, lovely watchers! I'm not thrilled about dA making AI opt-out and not opt-in, and putting it so you have to opt-out on each individual artwork. I have little to lose from this, because my product is 3D models and not the 2D promotional images, but it's especially predatory of people whose product and ouevre is 2D art. I don't know how many people are still here, but it's one more reason for people who draw and paint to delete their accounts.
Color Differences in DS 4.20.1.38
This was introduced by my notice by Snarl, and verified by my own render testing. I will show my results in the following discussion. There is a visible color difference in Iray render results in Daz Studio 4.20.1.38 vs. the pre-VDB, pre-ghost light fix 4.16.1.21 build I was able to test against. I rendered out to pngs and looked at both pngs on the same monitor to account for that type of differences. Here shown is G8F up close in default lighting on both builds. I checked all of the render settings to make sure they were the same, too, because if we could just change a render setting it would be an easy fix. This difference is relatively subtle. Let me show those separately so you can download them separately to compare. Here's 4.20: And here's 4.16: You might have to zoom in and set them overlapping so you see top part and top part or right and right, etc., but it's there. I don't know how or why this change has happened. Maybe it's because Daz decided the default was too
Babbling About Fluid Simulation
I have some feelings about sims right now. I have a lot of them, and I've just had caffeine. So I'm going to share them with you all. So, I recently submitted a water set for Daz Studio. Three times. You see, Daz3d didn't like either of my first two interpretations of the slosh pieces and pouring pieces that were simulated in Blender, so I ended up having to hand-sculpt parts of it and combine that with parts of the simmed pieces. The sloshes are entirely hand-sculpted from me staring at photo references, except for bits of the flying droplets I salvaged from the original simmed meshes. I wouldn't even have gotten that far if not for the very specific and detailed feedback they gave me, a privilege of working with the Review committee since 2011 and, I sincerely hope, demonstrating an eagerness to accept professional criticism when it gets me paid. I know for a fact that they have some artists where they just say an unvarnished yes or no because it's not worth getting yelled at
© 2015 - 2024 SickleYield
Comments24
Join the community to add your comment. Already a deviant? Log In
Thank you so much for your generosity in sharing your knowledge. Very much appreciated by this new content creator. I have a question re copyright. Can I use an item of clothing that is not mine to create a custom template for use on an item i would like to sell or is this breaking copyright laws.