ShopDreamUp AI ArtDreamUp
Deviation Actions

I've updated and corrected this article based on DAZ's documentation. You should read that if you want more information. This will continue to be more of a "plain talk" breakdown.
Let us begin with the different types of shaders from the "Base Mixing" dropdown at the top. Choosing one of these will hide or gray out some options and reveal others.
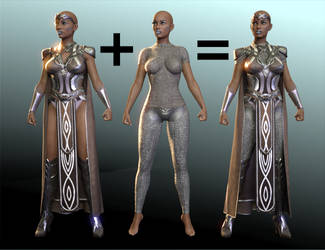
The Iray shader behaves as though it has three layers: The "base" layer, the "metallic flakes" layer on top of that, and the "top coat layer" on top of that. It is possible to turn off the top two layers and not use their settings, but the ability to use them is a property this shader has that 3Delight did not. This makes using shaders made for Iray very important when rendering to get the best look in Iray!
PBR Metallicity/Roughness:
This is the only one that exposes the Metallicity slider, which does more or less what you would expect - dial it in only on metals. DAZ's shaders included with the public beta swing heavily toward use of this shader model, not only on metals but on glass and skin, so contrary to what you would expect, they seem to feel it is the best "general use" shader.
PBR Specular/Glossiness:
This shader model locks the glossy weight at a higher value and hides that slider. It also exposes the specular glossy color. Just changing from this to the previous type and back can change the look of your shader to something smoother and less metallic. It is not used by any of the shaders DAZ has included with the public beta content, but in my experiments it is useful in some specific cases (I prefer it to their chosen look for human corneas and sclera, for instance).
DAZ's docs say this one is the closest to the way the 3Delight shader base was set up.
PBR Weighted:
This one takes the values of the diffuse weight and glossy weight and adjusts them relative to each other. It can be harder to get a good look with this but it is worth going into for some items. DAZ uses it on their included velvet and satin shaders. I checked this, but this does not mean the diffuse and glossy weights must add up to 1.0; it's definitely possible to have the total value of both be higher than 1.
---
Now we will tour the dials (except Metallicity, which was already mentioned). In many cases you will not see the options that go with a given dial until that dial is at a value higher than 0.
Diffuse Weight: This controls the contribution of your base color or diffuse map, as the similarly-named channel would in 3Delight. You don't see this option at all in PBR Metallicity/Roughness. Instead it is left at 100%.
Base Color: Your diffuse map goes here. Its effect goes away if refraction is on to any great degree regardless of the diffuse weight dial.
Diffuse Roughness: A higher diffuse roughness shows more shadows around the edges and the surface looks rougher. A lower diffuse roughness can make edges look almost shadeless. This is different from bump because it has more effect on how light is absorbed or reflected (absorbed more at high roughness, reflected more at low).
Diffuse Overlay (inclusive): New in July 2016, this adds another layer over the diffuse that has no bump, etc. of its own, but can add more color or noise. It has a strength, color, and roughness channel. If you put a black and white map in the strength channel it will only have the overlay show up in white areas, not in black, giving you the ability to control patchiness or transparency of the diffuse overlay's color channel. This is great for tattoos or dirt.
Translucency Weight: I think of this as the "jelly dial," because when it's turned up high, your surface looks like jelly. This is the effect that high SSS has in Poser and on some 3Delight shaders, but it's not SSS because it does not depend on the direction of light and it will have an effect regardless of backlighting. DAZ's skin shaders place a map in this channel and use the black and white SSS map for this purpose if one is present.
Scatter Only Vs. Scatter And Transmit:
Several settings have this option now, including Base Color Effect, Glossy Color Effect, Metallic Flakes Color Effect and Top Coat Color Effect.
Looking at the DAZ docs, I think the key phrase is probably "layered over transmission" vs. "sent to the transmission layer." It sounds like Iray is applying a Scatter Only value on "top" of the transmitted color, which explains why setting a blue diffuse and a green translucency looks blue with Scatter Only and dark blue/green with Scatter And Transmit.
This explains why, in the DS Genesis 2 shaders, Base Color is set to Scatter Only (so that the skin's base color is strongly shown) but glossy is set to Scatter And Transmit (to better simulate wet stuff under the skin when using the specularity at its surface).
Glossy Weight: How shiny the object's surface is. This is affected by a lot of following channels. Reflection is not controlled separate from the glossy settings, so turning on glossy weight WILL produce reflections. I have yet to find that anything changes the size of specular highlights other than changing the direction and strength of lights in the scene.
Share Glossy Inputs: On by default. This opens up more options if it is set to "off" when refraction and/or backscattering are being used; if backscattering and refraction weight are 0 just leave it on.
Glossy Color: The color of the main highlights, not unlike 3Delight's "specular color."
Glossy Reflectivity: 1.0 by default. The docs say this "roughly correlates with IOR" and that you can leave it alone on most things.
Glossy Specular: DAZ's docs say this sets the specular amount for the glossy. It doesn't seem to have much visual effect dialing it up and down.
Glossiness: This controls how sharp the visible highlights are (more = shinier).
Glossy Roughness: Turning this up makes the surface duller and less shiny, the opposite of turning up the glossiness. Like diffuse roughness, this accepts maps.
Glossy Anisotropy: This seems to control how much highlights are pulled or smeared (higher = more smeared). It is intended for brushed metal effects according to the Iray blog I linked before.
Backscattering Weight: This is hard to explain. It affects materials like some kinds of velvet or precious stones like tigereyes, where light is reflected straight back at 180 degrees. It tends to give a velvety no-firm-edges look when turned up higher, and is used on DAZ's "red velvet" shader.
Backscattering Roughness: The higher this is, the more surface details get obliterated in the velvety effect, at least in my testing. It's very high in DAZ's "red velvet" shader. I would use it on something like a star sapphire, I think. DAZ describes this effect as "adding sheen."
Refraction Index: Has an effect on both refraction and transmission! This is the refraction index of the material. A table of real refraction indices is available on Wikipedia, and these convert pretty much straight across (physically based rendering FTW!). You can still use this value with refraction weight at 0 if you're using Translucency and SSS, because it will use it when calculating light that goes through the surface.
Refraction Weight: How much the refraction affects the material overall. If it is at 1.0, the diffuse color will no longer affect the material except in Weighted mode, and color must be set with the glossy color or the SSS transmitted color. This seems to change the size of specular highlights when it's used, but I can't find that anything else does.
Abbe: This is the amount to which a refractive object behaves like a prism, splitting light into component colors. It only applies when refraction is greater than 0. You would not see much of this on, for example, a glass ball, but very much on a diamond or faceted object.
Glossy Anisotropy Rotations: This controls in what direction the highlights are pulled or smeared, if they are pulled or smeared by the glossy anisotropy slider. Thank you to vwrangler for helping me understand the docs I found on this!
Base Thin Film: This value appears three times in the shader, for different "layers" that the shader has (base thin film, metallic flakes thin film and top coat thin film).
When turned on for a given layer of the shader, it treats the layer as a very thin film overall, its thickness measured in nanometers. If this value is set to higher than 0 it activates the Base Thin Film IOR, which is another index of refraction value, so that you can set correct refraction. Use this only if you want the diffuse and glossy settings to apply as though they were a thin film over a surface; use the thin film versions found in metallic flakes and top coat similarly if you want those to behave like thin films.
Base Bump: The bump map goes here.
Base Normal Map: The normal map goes here. Unlike in 3Delight, it will also have a control slider when one is added.
Metallic Flakes Weight: Turning it on activates several other options as it "activates" the second layer of the Iray shader (the metallic flakes layer).
Metallic Flakes Color: The color of the metallic flakes. Using a different color from the base can give a nice glitter effect, or using a colored map in this channel.
Metallic Flakes Roughness: A low value by default; turning this up makes the flakes look rougher and less reflective.
Metallic Flakes Size: Turning this up makes the flakes look individually larger. Turning it WAY up gives a really weird rusty effect.
Metallic Flakes Strength: This makes the flakes more visible as opposed to larger, rougher or shinier. That is, it makes them show up more.
Metallic Flakes Density: This makes the flakes look closer together or further apart as well as bigger or smaller.
Metallic Flakes Thin Film: This makes the Metallic Flakes layer behave like a thin film.
Top Coat Weight: Turning this above 0 activates the third and topmost layer of the Iray shader. This, and all of its child settings (color, refraction, etc.) can be used to create an impression of thick sealant over paint, or slime over skin. I'm not sure what the layering mode and rotations do here, but the other settings are pretty much the same as discussed for other channels, just that they only affect the top coat itself. You can even give it its own bump map.
Thin Walled: This is on for things that are meant to represent just a thin layer or shell (a "bubble," say the docs), and off for things that are meant to represent liquids or transmissive solids (a "solid marble," say the docs). It must be off to use the transmitted settings below, since a thin-shelled item has no interior through which to transmit color.
Transmitted Measurement Distance/Scattering Measurement Distance: These are actually different because the transmitted distance affects how far into the material light goes before it is completely the transmitted color, and the scattering distance affects how far into the material it goes before it is scattered to the SSS amount you set. The higher the transmitted measurement distance, the denser and more opaque the material looks.
With Scattering Measurement Distance it's the opposite. The higher it is, the more light scatters through the material and the less opaque/dense it looks. Using both of these too much together can cancel a bit, so play with the values before deciding finally.
Using SSS (subsurface scattering) at a high value with Transmitted Color gives an effect that responds to light direction and intensity more than Translucency does, but it's still the concept of light being scattered by a dense non-opaque material when it hits the surface. Don't try to use a glossy color when SSS Amount is at 1.0; the effect is unpredictable and ugly.
SSS Direction tells the shader which direction the light is scattered, toward or away from a light source. Negative numbers go toward the light source, and positive numbers scatter away from it (0 will result in almost no scattering). A recommended value for skin is -0.5.
Emission Color: By default this is set to black. Setting it to white, gray, or a color causes the material to become emissive and cast light on the scene. This is not like 3Delight's Ambient glow, it really does cast light as an emitter. Turning this non-black activates its child settings.
Emission Temperature (K): The light temperature in Kelvin. This is a real property of lights. Here is a good chart. In general, it's easier to get a given color of light using the temperature than the actual emission color. If you want a color that can't be achieved this way, such as purple or green, set the temperature to around 5500 and only then use the emission color to tint it.
Two Sided Light: Emits from both sides of a mesh if thin-walled is on and this is set to "on." You can use it to make a plane emit from both sides.
Emission Profile: This is another real thing that you can download many of for free. Mostly it is used for creating the shape a lamp's light casts on a wall from behind a shade, so you only need it in special situations.
Luminance and Luminance Units: This controls how bright the light is. This is another real-world number you can look up for a given type of light bulb or flame. There are many available units; I started out using lumens but have recently switched to kcd/m^2 (kilo candela per square meter) because it can use much lower units (it takes millions of lumens to light most scenes).
Again, less like 3Delight, how close a light is to the object it lights really affects this and light scatters and fades more with distance. The size of the light object matters, too.
Cutout Opacity: This is opacity without refraction. It's called "cutout" because the engine literally doesn't see the geometry any more if this is set to 0; objects with transmaps don't necessarily lag the render (Iray does care about how big the maps are, but not the transparency itself). This is used to hide things or transmap clothing edges, etc., never to create transparency in water, glass, or other materials (we use refraction, SSS and translucency for that).
Displacement Strength: The displacement map goes here. Choosing one activates the other displacement options. Minimum and Maximum are similar to other engines. It's important to note the SubD Displacement Level, though, because you want that to be higher than 1 for most displacement if it's being used to add detail. It does not have to be the same as your mesh's SubD, but that's certainly an option. This is too low if your displacement map looks jagged in render.
Horizontal/Vertical Tiles And Offset: Tiling works basically the same as in 3Delight. These control the amount of times a texture is tiled and how far offset the tiles are dragged.
UV Set: Unchanged as well. This is the dropdown where multiple UV sets will appear if an item (such as Genesis 2) has multiple UVs.
Smooth: On by default; should be turned off for certain types of hard-surfaced objects (gems, some construction items, etc.), otherwise ignore it. Having SubD on the mesh actually turns this off anyway.
The options below this affect how smoothing is applied.
That's what I know so far! Thank you to DAZ Spooky for pointing me to the documentation to correct some early misconceptions that I had.
Let us begin with the different types of shaders from the "Base Mixing" dropdown at the top. Choosing one of these will hide or gray out some options and reveal others.
The Iray shader behaves as though it has three layers: The "base" layer, the "metallic flakes" layer on top of that, and the "top coat layer" on top of that. It is possible to turn off the top two layers and not use their settings, but the ability to use them is a property this shader has that 3Delight did not. This makes using shaders made for Iray very important when rendering to get the best look in Iray!
PBR Metallicity/Roughness:
This is the only one that exposes the Metallicity slider, which does more or less what you would expect - dial it in only on metals. DAZ's shaders included with the public beta swing heavily toward use of this shader model, not only on metals but on glass and skin, so contrary to what you would expect, they seem to feel it is the best "general use" shader.
PBR Specular/Glossiness:
This shader model locks the glossy weight at a higher value and hides that slider. It also exposes the specular glossy color. Just changing from this to the previous type and back can change the look of your shader to something smoother and less metallic. It is not used by any of the shaders DAZ has included with the public beta content, but in my experiments it is useful in some specific cases (I prefer it to their chosen look for human corneas and sclera, for instance).
DAZ's docs say this one is the closest to the way the 3Delight shader base was set up.
PBR Weighted:
This one takes the values of the diffuse weight and glossy weight and adjusts them relative to each other. It can be harder to get a good look with this but it is worth going into for some items. DAZ uses it on their included velvet and satin shaders. I checked this, but this does not mean the diffuse and glossy weights must add up to 1.0; it's definitely possible to have the total value of both be higher than 1.
---
Now we will tour the dials (except Metallicity, which was already mentioned). In many cases you will not see the options that go with a given dial until that dial is at a value higher than 0.
Diffuse Weight: This controls the contribution of your base color or diffuse map, as the similarly-named channel would in 3Delight. You don't see this option at all in PBR Metallicity/Roughness. Instead it is left at 100%.
Base Color: Your diffuse map goes here. Its effect goes away if refraction is on to any great degree regardless of the diffuse weight dial.
Diffuse Roughness: A higher diffuse roughness shows more shadows around the edges and the surface looks rougher. A lower diffuse roughness can make edges look almost shadeless. This is different from bump because it has more effect on how light is absorbed or reflected (absorbed more at high roughness, reflected more at low).
Diffuse Overlay (inclusive): New in July 2016, this adds another layer over the diffuse that has no bump, etc. of its own, but can add more color or noise. It has a strength, color, and roughness channel. If you put a black and white map in the strength channel it will only have the overlay show up in white areas, not in black, giving you the ability to control patchiness or transparency of the diffuse overlay's color channel. This is great for tattoos or dirt.
Translucency Weight: I think of this as the "jelly dial," because when it's turned up high, your surface looks like jelly. This is the effect that high SSS has in Poser and on some 3Delight shaders, but it's not SSS because it does not depend on the direction of light and it will have an effect regardless of backlighting. DAZ's skin shaders place a map in this channel and use the black and white SSS map for this purpose if one is present.
Scatter Only Vs. Scatter And Transmit:
Several settings have this option now, including Base Color Effect, Glossy Color Effect, Metallic Flakes Color Effect and Top Coat Color Effect.
Looking at the DAZ docs, I think the key phrase is probably "layered over transmission" vs. "sent to the transmission layer." It sounds like Iray is applying a Scatter Only value on "top" of the transmitted color, which explains why setting a blue diffuse and a green translucency looks blue with Scatter Only and dark blue/green with Scatter And Transmit.
This explains why, in the DS Genesis 2 shaders, Base Color is set to Scatter Only (so that the skin's base color is strongly shown) but glossy is set to Scatter And Transmit (to better simulate wet stuff under the skin when using the specularity at its surface).
Glossy Weight: How shiny the object's surface is. This is affected by a lot of following channels. Reflection is not controlled separate from the glossy settings, so turning on glossy weight WILL produce reflections. I have yet to find that anything changes the size of specular highlights other than changing the direction and strength of lights in the scene.
Share Glossy Inputs: On by default. This opens up more options if it is set to "off" when refraction and/or backscattering are being used; if backscattering and refraction weight are 0 just leave it on.
Glossy Color: The color of the main highlights, not unlike 3Delight's "specular color."
Glossy Reflectivity: 1.0 by default. The docs say this "roughly correlates with IOR" and that you can leave it alone on most things.
Glossy Specular: DAZ's docs say this sets the specular amount for the glossy. It doesn't seem to have much visual effect dialing it up and down.
Glossiness: This controls how sharp the visible highlights are (more = shinier).
Glossy Roughness: Turning this up makes the surface duller and less shiny, the opposite of turning up the glossiness. Like diffuse roughness, this accepts maps.
Glossy Anisotropy: This seems to control how much highlights are pulled or smeared (higher = more smeared). It is intended for brushed metal effects according to the Iray blog I linked before.
Backscattering Weight: This is hard to explain. It affects materials like some kinds of velvet or precious stones like tigereyes, where light is reflected straight back at 180 degrees. It tends to give a velvety no-firm-edges look when turned up higher, and is used on DAZ's "red velvet" shader.
Backscattering Roughness: The higher this is, the more surface details get obliterated in the velvety effect, at least in my testing. It's very high in DAZ's "red velvet" shader. I would use it on something like a star sapphire, I think. DAZ describes this effect as "adding sheen."
Refraction Index: Has an effect on both refraction and transmission! This is the refraction index of the material. A table of real refraction indices is available on Wikipedia, and these convert pretty much straight across (physically based rendering FTW!). You can still use this value with refraction weight at 0 if you're using Translucency and SSS, because it will use it when calculating light that goes through the surface.
Refraction Weight: How much the refraction affects the material overall. If it is at 1.0, the diffuse color will no longer affect the material except in Weighted mode, and color must be set with the glossy color or the SSS transmitted color. This seems to change the size of specular highlights when it's used, but I can't find that anything else does.
Abbe: This is the amount to which a refractive object behaves like a prism, splitting light into component colors. It only applies when refraction is greater than 0. You would not see much of this on, for example, a glass ball, but very much on a diamond or faceted object.
Glossy Anisotropy Rotations: This controls in what direction the highlights are pulled or smeared, if they are pulled or smeared by the glossy anisotropy slider. Thank you to vwrangler for helping me understand the docs I found on this!
Base Thin Film: This value appears three times in the shader, for different "layers" that the shader has (base thin film, metallic flakes thin film and top coat thin film).
When turned on for a given layer of the shader, it treats the layer as a very thin film overall, its thickness measured in nanometers. If this value is set to higher than 0 it activates the Base Thin Film IOR, which is another index of refraction value, so that you can set correct refraction. Use this only if you want the diffuse and glossy settings to apply as though they were a thin film over a surface; use the thin film versions found in metallic flakes and top coat similarly if you want those to behave like thin films.
Base Bump: The bump map goes here.
Base Normal Map: The normal map goes here. Unlike in 3Delight, it will also have a control slider when one is added.
Metallic Flakes Weight: Turning it on activates several other options as it "activates" the second layer of the Iray shader (the metallic flakes layer).
Metallic Flakes Color: The color of the metallic flakes. Using a different color from the base can give a nice glitter effect, or using a colored map in this channel.
Metallic Flakes Roughness: A low value by default; turning this up makes the flakes look rougher and less reflective.
Metallic Flakes Size: Turning this up makes the flakes look individually larger. Turning it WAY up gives a really weird rusty effect.
Metallic Flakes Strength: This makes the flakes more visible as opposed to larger, rougher or shinier. That is, it makes them show up more.
Metallic Flakes Density: This makes the flakes look closer together or further apart as well as bigger or smaller.
Metallic Flakes Thin Film: This makes the Metallic Flakes layer behave like a thin film.
Top Coat Weight: Turning this above 0 activates the third and topmost layer of the Iray shader. This, and all of its child settings (color, refraction, etc.) can be used to create an impression of thick sealant over paint, or slime over skin. I'm not sure what the layering mode and rotations do here, but the other settings are pretty much the same as discussed for other channels, just that they only affect the top coat itself. You can even give it its own bump map.
Thin Walled: This is on for things that are meant to represent just a thin layer or shell (a "bubble," say the docs), and off for things that are meant to represent liquids or transmissive solids (a "solid marble," say the docs). It must be off to use the transmitted settings below, since a thin-shelled item has no interior through which to transmit color.
Transmitted Measurement Distance/Scattering Measurement Distance: These are actually different because the transmitted distance affects how far into the material light goes before it is completely the transmitted color, and the scattering distance affects how far into the material it goes before it is scattered to the SSS amount you set. The higher the transmitted measurement distance, the denser and more opaque the material looks.
With Scattering Measurement Distance it's the opposite. The higher it is, the more light scatters through the material and the less opaque/dense it looks. Using both of these too much together can cancel a bit, so play with the values before deciding finally.
Using SSS (subsurface scattering) at a high value with Transmitted Color gives an effect that responds to light direction and intensity more than Translucency does, but it's still the concept of light being scattered by a dense non-opaque material when it hits the surface. Don't try to use a glossy color when SSS Amount is at 1.0; the effect is unpredictable and ugly.
SSS Direction tells the shader which direction the light is scattered, toward or away from a light source. Negative numbers go toward the light source, and positive numbers scatter away from it (0 will result in almost no scattering). A recommended value for skin is -0.5.
Emission Color: By default this is set to black. Setting it to white, gray, or a color causes the material to become emissive and cast light on the scene. This is not like 3Delight's Ambient glow, it really does cast light as an emitter. Turning this non-black activates its child settings.
Emission Temperature (K): The light temperature in Kelvin. This is a real property of lights. Here is a good chart. In general, it's easier to get a given color of light using the temperature than the actual emission color. If you want a color that can't be achieved this way, such as purple or green, set the temperature to around 5500 and only then use the emission color to tint it.
Two Sided Light: Emits from both sides of a mesh if thin-walled is on and this is set to "on." You can use it to make a plane emit from both sides.
Emission Profile: This is another real thing that you can download many of for free. Mostly it is used for creating the shape a lamp's light casts on a wall from behind a shade, so you only need it in special situations.
Luminance and Luminance Units: This controls how bright the light is. This is another real-world number you can look up for a given type of light bulb or flame. There are many available units; I started out using lumens but have recently switched to kcd/m^2 (kilo candela per square meter) because it can use much lower units (it takes millions of lumens to light most scenes).
Again, less like 3Delight, how close a light is to the object it lights really affects this and light scatters and fades more with distance. The size of the light object matters, too.
Cutout Opacity: This is opacity without refraction. It's called "cutout" because the engine literally doesn't see the geometry any more if this is set to 0; objects with transmaps don't necessarily lag the render (Iray does care about how big the maps are, but not the transparency itself). This is used to hide things or transmap clothing edges, etc., never to create transparency in water, glass, or other materials (we use refraction, SSS and translucency for that).
Displacement Strength: The displacement map goes here. Choosing one activates the other displacement options. Minimum and Maximum are similar to other engines. It's important to note the SubD Displacement Level, though, because you want that to be higher than 1 for most displacement if it's being used to add detail. It does not have to be the same as your mesh's SubD, but that's certainly an option. This is too low if your displacement map looks jagged in render.
Horizontal/Vertical Tiles And Offset: Tiling works basically the same as in 3Delight. These control the amount of times a texture is tiled and how far offset the tiles are dragged.
UV Set: Unchanged as well. This is the dropdown where multiple UV sets will appear if an item (such as Genesis 2) has multiple UVs.
Smooth: On by default; should be turned off for certain types of hard-surfaced objects (gems, some construction items, etc.), otherwise ignore it. Having SubD on the mesh actually turns this off anyway.
The options below this affect how smoothing is applied.
That's what I know so far! Thank you to DAZ Spooky for pointing me to the documentation to correct some early misconceptions that I had.
Default VS. PBR Skin Shader: Alexandra 8 Tests
User @DigitalHallucination had some interesting comments and questions about shaders under the old Iray Surfaces tutorial from 2015. That led to some experimentation with shaders this morning, the results of which I will share now. Please, please feel free to comment and debate. I think this is an issue of interest to more or less all of us. I commented offhand that I didn't think the PBRSkin shader was an improvement, but that the maps in use were what made the difference, and DH disagreed with this and provided some comparison renders using Alexandra 8. They definitely looked definitive, so I decided to run my own tests. At first I tried it with base G8F, but that wasn't an apples to apples comparison because G8F originally uses the old glossiness method, so she's going to look worse compared to any shader that uses the new spec. So, like DH, I went to Alexandra. In this case I used the default lighting with the camera headlamp turned off, Subd1, Alexandra 8 at 100%, and the
Deviantart's Default AI Opt-In
EDIT: They put in a mass opt out! Thanks for letting me know when I missed the news, lovely watchers! I'm not thrilled about dA making AI opt-out and not opt-in, and putting it so you have to opt-out on each individual artwork. I have little to lose from this, because my product is 3D models and not the 2D promotional images, but it's especially predatory of people whose product and ouevre is 2D art. I don't know how many people are still here, but it's one more reason for people who draw and paint to delete their accounts.
Color Differences in DS 4.20.1.38
This was introduced by my notice by Snarl, and verified by my own render testing. I will show my results in the following discussion. There is a visible color difference in Iray render results in Daz Studio 4.20.1.38 vs. the pre-VDB, pre-ghost light fix 4.16.1.21 build I was able to test against. I rendered out to pngs and looked at both pngs on the same monitor to account for that type of differences. Here shown is G8F up close in default lighting on both builds. I checked all of the render settings to make sure they were the same, too, because if we could just change a render setting it would be an easy fix. This difference is relatively subtle. Let me show those separately so you can download them separately to compare. Here's 4.20: And here's 4.16: You might have to zoom in and set them overlapping so you see top part and top part or right and right, etc., but it's there. I don't know how or why this change has happened. Maybe it's because Daz decided the default was too
Babbling About Fluid Simulation
I have some feelings about sims right now. I have a lot of them, and I've just had caffeine. So I'm going to share them with you all. So, I recently submitted a water set for Daz Studio. Three times. You see, Daz3d didn't like either of my first two interpretations of the slosh pieces and pouring pieces that were simulated in Blender, so I ended up having to hand-sculpt parts of it and combine that with parts of the simmed pieces. The sloshes are entirely hand-sculpted from me staring at photo references, except for bits of the flying droplets I salvaged from the original simmed meshes. I wouldn't even have gotten that far if not for the very specific and detailed feedback they gave me, a privilege of working with the Review committee since 2011 and, I sincerely hope, demonstrating an eagerness to accept professional criticism when it gets me paid. I know for a fact that they have some artists where they just say an unvarnished yes or no because it's not worth getting yelled at
Featured in Groups


© 2015 - 2024 SickleYield
Comments227
Join the community to add your comment. Already a deviant? Log In
Does all this still hold up in 2023? I'm sure it does.
I was looking for just this very thing today. Nicely done. The reason I was doing some searching was to try and understand which slot to apply a smooth/roughness map, whether it should go in the diffuse roughness or the glossy roughness.