ShopDreamUp AI ArtDreamUp
Deviation Actions

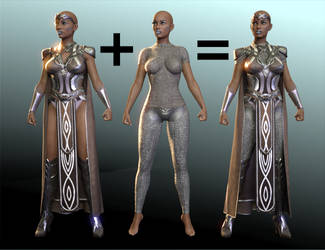
To convert from M4 or V4, you need M4 or V4 for Genesis 2.
There is a huge amount of clothing content for Michael 4 and Victoria 4. Some of it is by really outstanding artists who do not or have only recently worked with G1 or G2, and some is quality work that was never updated but is available cheaply, including many of DAZ's Platinum Club items. You can take best advantage of this by using Transfer Utility in addition to AutoFit. This tutorial will show you how to use Transfer Utility to preserve skirt handles, fancy sleeve rigging, or basically any extra bones that are normally lost in the conversion process. I've done a different tutorial for converting custom bone items between G1 and G2 already and a post on converting high heels to G2.
I posted this in the thread for the Sickle Rigging and Morphing System over on the DAZ forums, but vwrangler pointed out there are some advantages to having it here as well, so that people can favorite and archive it more easily. Also, you don't really need SRMS (or G2 Basic Rigs from my store) to do this; since this method lets us keep skirt handles, no template should be necessary at all. It just can provide a smoother conversion in some cases, and some of you already have it, so I will include that option in the directions.
You absolutely do need to have DAZ Studio 4.6 or later. DAZ Studio 4.6 contains the update that allows weight maps to overlap at values higher than 100%, and that's very necessary when keeping Generation 4 handles.
---------
Load a Gen 4 or other item. Load Genesis 1 or one of the Genesis 2 figures. Do not apply morphs, scaling, or poses to the figure. If you try to use this to quickie-fit an outfit to your posed and morphed characters it probably won't work.
In Scene Tab, go to edit—rigging—convert figure to weight mapping. Choose TriAx.
Start the Transfer Utility. Its icon looks like an arrow pointing up and to the right. As "Source" choose the figure. As "Target" choose the clothing item. Also choose Clone or Morph V4 on the left dropdown under Source. You may need to experiment with what works best on the individual item, but for me it usually it needs to be Clone V4 if there are long sleeves whereas Morph V4 sometimes gives better skirt results.
Choose template—SRMS bodysuit or dress or boots as appropriate, or Basic Dress/Basic Tunic if using G2. Otherwise using no template may be best. I definitely recommend that on items with fused pants and boots.
Uncheck everything but Morphs and Reverse Source Shape from Target in the advanced options below. Add a smoothing modifier. Do not check Fit to Source Figure. Uncheck it if it is checked. Vwrangler reports that leaving this checked may result in bad results on superposing items like the Amazing Braid from Renderosity.
Let it run. It may ball up when it’s done. If so, don't panic.
Select G1/G2 and then the item with ctrl+click in Scene Tab (in this order). Click on the tiny icon that looks like three lines and a triangle to the upper right of this. Activate Edit—Rigging—Transfer Rigging (Figure Space). Now it should be fitted to G1/G2 properly but still have its extra bones.
Save the clothing item to library and reload. Do not move or morph G1/G2 before you do so.
I've seen others on the forum reporting incorrectly on the use of Wearables presets. Don't save as these. The purpose of Wearables presets is to save a loader that can load many preexisting items at once, not an individual item that doesn't exist in the library yet. Instead, use File--Save As--Figure/Prop Asset, and fill out the form accordingly. Try not to use the exact name of the product in case it is later converted by the original artist and you might want both versions.
-----
In my testing, this method has been effective, although one still has to add a push modifier sometimes (found in that same edit dialogue as the transfer rigging option). There's no helping bad or unfused geometry, so watch for sellers who seem to do that regularly and don't plan on buying their content for conversion use. When in doubt, buy their cheapest thing that is still recent, test it, and see if it performs, has been my policy. I can't list everyone who makes conversion-friendly products, but here are those I can attest to personally:
-DAZ3D vendors and legacy content, basically across the board but definitely Daz Originals/Platinum Club
-Xurge3d (One or two bodysuits have mesh gapping, but usually if you update the mats to use his displacement it's not visible)
-Alfaseed/Aerysoul (About everything I tried, lots of very dense, fused geometry so very good candidates)
-Val3dArt (Kyrie, at least)
-PowerAge is not 100%, but recent work is good. I have a freebie sweater of his with split geometry that comes out dreadfully, but the BlackMoon and his shiny armors converted well.
-I haven't tested OutOfTouch's earlier stuff, but more recent pieces are very sound geometry and he even makes things for G2 now (hooray).
-I don't have LadyLittleFox's things but have heard mostly positive things about their convertibility.
I will be happy to add to this list if you have others to suggest whose work you are certain converts well or poorly based on its geometry.
Default VS. PBR Skin Shader: Alexandra 8 Tests
User @DigitalHallucination had some interesting comments and questions about shaders under the old Iray Surfaces tutorial from 2015. That led to some experimentation with shaders this morning, the results of which I will share now. Please, please feel free to comment and debate. I think this is an issue of interest to more or less all of us. I commented offhand that I didn't think the PBRSkin shader was an improvement, but that the maps in use were what made the difference, and DH disagreed with this and provided some comparison renders using Alexandra 8. They definitely looked definitive, so I decided to run my own tests. At first I tried it with base G8F, but that wasn't an apples to apples comparison because G8F originally uses the old glossiness method, so she's going to look worse compared to any shader that uses the new spec. So, like DH, I went to Alexandra. In this case I used the default lighting with the camera headlamp turned off, Subd1, Alexandra 8 at 100%, and the
Deviantart's Default AI Opt-In
EDIT: They put in a mass opt out! Thanks for letting me know when I missed the news, lovely watchers! I'm not thrilled about dA making AI opt-out and not opt-in, and putting it so you have to opt-out on each individual artwork. I have little to lose from this, because my product is 3D models and not the 2D promotional images, but it's especially predatory of people whose product and ouevre is 2D art. I don't know how many people are still here, but it's one more reason for people who draw and paint to delete their accounts.
Color Differences in DS 4.20.1.38
This was introduced by my notice by Snarl, and verified by my own render testing. I will show my results in the following discussion. There is a visible color difference in Iray render results in Daz Studio 4.20.1.38 vs. the pre-VDB, pre-ghost light fix 4.16.1.21 build I was able to test against. I rendered out to pngs and looked at both pngs on the same monitor to account for that type of differences. Here shown is G8F up close in default lighting on both builds. I checked all of the render settings to make sure they were the same, too, because if we could just change a render setting it would be an easy fix. This difference is relatively subtle. Let me show those separately so you can download them separately to compare. Here's 4.20: And here's 4.16: You might have to zoom in and set them overlapping so you see top part and top part or right and right, etc., but it's there. I don't know how or why this change has happened. Maybe it's because Daz decided the default was too
Babbling About Fluid Simulation
I have some feelings about sims right now. I have a lot of them, and I've just had caffeine. So I'm going to share them with you all. So, I recently submitted a water set for Daz Studio. Three times. You see, Daz3d didn't like either of my first two interpretations of the slosh pieces and pouring pieces that were simulated in Blender, so I ended up having to hand-sculpt parts of it and combine that with parts of the simmed pieces. The sloshes are entirely hand-sculpted from me staring at photo references, except for bits of the flying droplets I salvaged from the original simmed meshes. I wouldn't even have gotten that far if not for the very specific and detailed feedback they gave me, a privilege of working with the Review committee since 2011 and, I sincerely hope, demonstrating an eagerness to accept professional criticism when it gets me paid. I know for a fact that they have some artists where they just say an unvarnished yes or no because it's not worth getting yelled at
Featured in Groups

© 2013 - 2024 SickleYield
Comments68
Join the community to add your comment. Already a deviant? Log In
What if the object for M4 on Genesis doesn't follow the transformations/posing after that?