ShopDreamUp AI ArtDreamUp
Deviation Actions

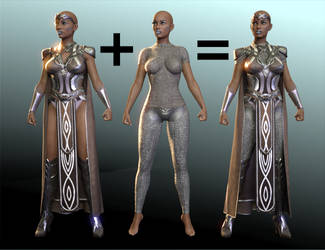
By an "adjusted" FBM I mean one different enough from the base to require adjusting the rigging. You've seen these for Genesis - the Troll, the Freaks, and Mavka are examples.
For this example I'm using Blender and DAZ Studio 4.5 Pro, but it should work with other modeling software if you can figure out the scaling.
This was another request.
----
First of all, it is necessary to export a "base" Genesis to morph.
Load Genesis into your scene, or whatever other figure you wish to use.
Go to Parameters and turn the subdivision level down to 0 and the resolution to Base. This is very important. If you do not do this, your new morph will not load.
Now file--export--wavefront/obj. I choose to work at Poser scale on import and export because it works with Blender's base import/export scaling, but that is completely up to you.
Choose a location where you will store this morph base. I have a "UsefulOBJ" folder containing all my FBM bases in my Blender directory. Export your Genesis morph base to this directory, giving it a reasonably name such as GenesisMorphBase.
Import the morph base into your modeling software. Make sure you import with polygroups and retain vertex order if those are options.
Now create your morph by editing this base's shape. I made a quickie "amazon" proportion set taller than the base to test mine.
Export the obj. Make sure you retain vertex order again.
Select your loaded base-rez Genesis in DS4.5. Start Morph Loader Pro. It looks like a flexing arm with a letter P on the bicep. I have mine hotkeyed to ctrl+m since I use it so often (and Transfer Utility to ctrl+t, but that's beside the point).
Navigate to your exported morph. Notice it uses the name you gave the obj when you exported it, but you can double-click on this to change it if you wish.
Expand the options and choose a group for it, or create a new one. In this case I'll use Actor/Female/Fantasy Sci Fi.
Don't leave it as Morph/Morph Loader Pro. That instantly tells the customer you didn't bother and it looks bad when others use the morph.
Click Accept without changing any other options.
Your morph should now load. A dialogue box will pop up telling you if it has.
Dial it in to 1.0 or 100% in the Parameters.
Turn on the Bone tool. It looks like a bone with a bandaid across it.
Now you can see that the skeleton of Genesis is too small or too large for your scale-affecting morph. Right-click and choose edit--adjust rigging to shape.
Turn on Orientation on the screen that comes up. You should be able to leave other things as they are and click Accept.
Now you can see your skeleton is refitted to appropriately match the morph. It's time to freeze this to the morph so that it turns on when the morph is on.
Go to the Property Editor tab. If you don't have one you can create one using Window--Panes (tabs) -- Property Editor.
It is normal for it to take literally five minutes or more for this to load on a Genesis with lots of morphs. Go do something else while you wait, such as writing the first half of a tutorial on your deviantart blog. Or inform me in the comments how to get around this.
When the property editor is finally accessible to you, go to the right-hand panel, right-click, and choose ERC Freeze.
In the dialogue that comes up, choose Genesis as the Figure and also as the Node.
In the Property dropdown below that, find your new morph. This can be difficult. Try typing the first couple of letters of it to scroll to different things with those letters.
Once it is selected, go down and uncheck Restore Figure Rigging.
Now select Accept. You may have to wait a while again while it processes the new frozen ERC.
Now go back to your Translate widget (or whichever) and select Genesis.
Choose File--Save As--Support Asset--Morph Assets.
In the dialogue that comes up, put in your screen name for vendor name and the name of the new morph under Product Name.
Expand the morphs dropdown below, find your morph, and click the box to its left to put a check mark in it.
Choose Accept.
Now delete Genesis from the scene and reload it. If you dial in your morph with the Bone tool up, you should now see the skeleton adjust with it to the proper size.
----
This should work with any TriAx figure in DS4.5, not just Genesis.
If you're new here, please visit my stores at
Renderosity: www.renderosity.com/mod/bcs/in…
DAZ: www.daz3d.com/sickleyield
Default VS. PBR Skin Shader: Alexandra 8 Tests
User @DigitalHallucination had some interesting comments and questions about shaders under the old Iray Surfaces tutorial from 2015. That led to some experimentation with shaders this morning, the results of which I will share now. Please, please feel free to comment and debate. I think this is an issue of interest to more or less all of us. I commented offhand that I didn't think the PBRSkin shader was an improvement, but that the maps in use were what made the difference, and DH disagreed with this and provided some comparison renders using Alexandra 8. They definitely looked definitive, so I decided to run my own tests. At first I tried it with base G8F, but that wasn't an apples to apples comparison because G8F originally uses the old glossiness method, so she's going to look worse compared to any shader that uses the new spec. So, like DH, I went to Alexandra. In this case I used the default lighting with the camera headlamp turned off, Subd1, Alexandra 8 at 100%, and the
Deviantart's Default AI Opt-In
EDIT: They put in a mass opt out! Thanks for letting me know when I missed the news, lovely watchers! I'm not thrilled about dA making AI opt-out and not opt-in, and putting it so you have to opt-out on each individual artwork. I have little to lose from this, because my product is 3D models and not the 2D promotional images, but it's especially predatory of people whose product and ouevre is 2D art. I don't know how many people are still here, but it's one more reason for people who draw and paint to delete their accounts.
Color Differences in DS 4.20.1.38
This was introduced by my notice by Snarl, and verified by my own render testing. I will show my results in the following discussion. There is a visible color difference in Iray render results in Daz Studio 4.20.1.38 vs. the pre-VDB, pre-ghost light fix 4.16.1.21 build I was able to test against. I rendered out to pngs and looked at both pngs on the same monitor to account for that type of differences. Here shown is G8F up close in default lighting on both builds. I checked all of the render settings to make sure they were the same, too, because if we could just change a render setting it would be an easy fix. This difference is relatively subtle. Let me show those separately so you can download them separately to compare. Here's 4.20: And here's 4.16: You might have to zoom in and set them overlapping so you see top part and top part or right and right, etc., but it's there. I don't know how or why this change has happened. Maybe it's because Daz decided the default was too
Babbling About Fluid Simulation
I have some feelings about sims right now. I have a lot of them, and I've just had caffeine. So I'm going to share them with you all. So, I recently submitted a water set for Daz Studio. Three times. You see, Daz3d didn't like either of my first two interpretations of the slosh pieces and pouring pieces that were simulated in Blender, so I ended up having to hand-sculpt parts of it and combine that with parts of the simmed pieces. The sloshes are entirely hand-sculpted from me staring at photo references, except for bits of the flying droplets I salvaged from the original simmed meshes. I wouldn't even have gotten that far if not for the very specific and detailed feedback they gave me, a privilege of working with the Review committee since 2011 and, I sincerely hope, demonstrating an eagerness to accept professional criticism when it gets me paid. I know for a fact that they have some artists where they just say an unvarnished yes or no because it's not worth getting yelled at
© 2013 - 2024 SickleYield
Comments11
Join the community to add your comment. Already a deviant? Log In
Have you created an updated version of this. I can follow along and everything seems to work. But I have a duplicate formulas problem I think because of not know exactly what options I should be selecting in the new ERC freeze window. Thanks in advance.